Configuring VSCode to Work Vetur and ESLint With The Airbnb Base Config
When I first started out coding with Vue the most in vogue linter was Prettier and it remains popular to this day. You couldn't spend five minutes on Twitter or Hacker News without seeing a new post or mention about Prettier. I too was swept up by this plugin that would allow me to not think about how my code would look and instead work on getting my code to do what I wanted it to.
As is typical with most horror movies everything was going great up at the cabin. I had a configuration that worked out smoothly. I no longer needed to worry about where I was putting curly brackets on functions or whether my parameters on my arrow function should be wrapped in parentheses.
Then, as the official Vue ESLint plugin grew up and became more advanced and incorporated more elements of the official style guide I wanted to incorporate it into my linting. The Vue ESLint plugin and Prettier began fighting. The fighting got more intense with one of them screaming that a space should come before the slash in my <custom-component /> while the other insistent that there be no space. This and countless other battles raged on and it appears I was not the only one having trouble with these two.
Enter ESLint Airbnb Base Config
Airbnb publishes an ESLint configuration that is very popular, has many of the same conventions as Prettier and actually goes a bit further in many places helping to clean up your code. It is both more opinionated and less strict at the same time.
If you are using the Vue CLI you should install the ESLint plugin and Airbnb config through the CLI
Installing The Airbnb config and the Vue ESLint plugin into your projects with npm version 5+ is the easiest by utilizing npx.
npm install --save-dev eslint eslint-plugin-vue
npx install-peerdeps --dev eslint-config-airbnb-base
Configuring ESLint
In the root of your project create a .eslintrc.js file. This file will contain configuration options to let ESLint know which rules to use and additional options to allow ESLint to work with the Airbnb config
module.exports = {
    root: true,
    parserOptions: {
      parser: "babel-eslint"
    },
    env: {
      node: true
    },
    extends: ["airbnb-base", "plugin:vue/strongly-recommended"],
    // The rules are personal preference.
    // These rules are just an example of the rules I currently have configured.
    rules: {
      "no-console": "warn",
      "vue/max-attributes-per-line": [
        2,
        {
          multiline: {
            allowFirstLine: true
          }
        }
      ],
      quotes: ["error", "double"],
      "max-len": ["error", { code: 140, ignoreStrings: true, ignoreUrls: true }],
      "import/no-unresolved": 0,
      "linebreak-style": 0,
      "comma-dangle": 0,
      "import/prefer-default-export": 0,
      "no-unused-expressions": ["error", { allowTernary: true }],
      "no-underscore-dangle": 0,
      "no-param-reassign": 0,
      "object-curly-newline": ["error", { ObjectPattern: "never" }],
      "vue/html-closing-bracket-newline": ["error", {
        singleline: "never",
        multiline: "never"
      }]
    }
  };
Altering the rules of an ESLint config is a very personal thing. I would suggest spending some time looking at the documentation of the rules for both Vue and Airbnb and discussing with your team to make an informed decision about turning off or altering rules.
We're now setup and can run commands like npx eslint src/**/*.vue which is great for continuous integration systems or doing a linting check on a git check-in but it is not super helpful when actively developing.
Luckily VSCode has an ESLint Plugin that can be used to do real-time checking on our code without having to run any commands.
Once the plugin is installed open your user settings in VSCode by hitting cmd/ctrl+shift+p and typing in Preferences: Open Settings (JSON). After selecting the open settings command a file will open in the editor where we can configure the necessary settings in order to get ESLint to work with .vue files.
{
    /* Your other settings go here */
    "eslint.run": "onType",
    "eslint.autoFixOnSave": true,
    "eslint.validate": [
        {
            "language": "vue",
            "autoFix": true
        },
        {
            "language": "html",
            "autoFix": true
        },
        {
            "language": "javascript",
            "autoFix": true
        }
    ],
}
Now, when the VSCode editor is open on a .js or .vue file we should see red and yellow squiggles under code that ESLint has determined is problematic.

Final Tip
The ESLint plugin adds a handful of available shortcuts to VSCode Ctrl+k, Ctrl+s. One that I particularly like is "ESLint: Fix all auto-fixable Problems." Typically I'll set this to Ctrl+Alt+F and smash this combination a couple of times before saving. ESLint will typically only auto-fix one time, so if there are fixes that rely on other fixes hitting this key combination a few times insures that all auto-fixable problems will be caught before your continous integration catches them.
Additionally, you are likely going to want to disable the VSCode setting for Format on Save and set the "Vetur Default Formatter" for HTML and JS to none.
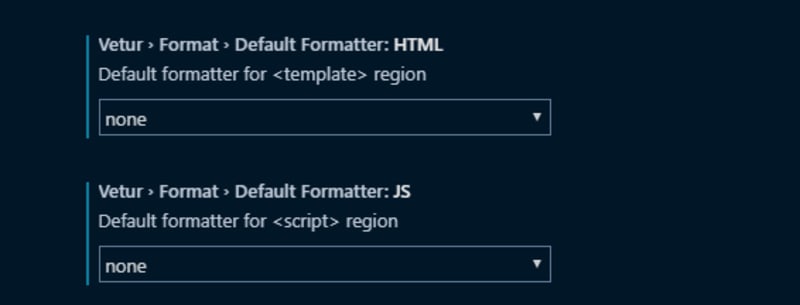
Usually I'll do this on the workspace settings so other projects can still format on save if needed. This step is necessary because the Vetur formatters will fight with the ESLint formatters. You want to let ESLint do its job and not have another formatter stepping in. This does mean that things like CSS may not format properly all the time if you are just relying on ESLint. I think case I'll use the format shortcut shift+alt+f to format just the CSS.
