Using Strapi Policies To Create Editable User Profiles

Strapi's roles & permissions plugin will get you a long way in registering, sign-in and managing users in your application. Unfortunately, Strapi does not provide a built-in strategy for allowing users to manage their own personal information via a user profile, instead leaving those decisions to you, the developer.
We will use Strapi's policy customizations to extend the Strapi API. The policy will allow authenticated users to update their user profile in a secure manner.
Extending The User Content-Type
Display names, subscription status, and user image are a few examples of the information we may want to allow the user to edit. In contrast, we will exclude e-mail address, role and other sensitive fields from user editing. In this example we will tackle, display name and if they subscribe to the weekly newsletter.
Using Strapi's "Content-Types Builder" select the User collection type. Select "Add another field", choose Text and give it a name of displayName. Next, add another field and this time choose Boolean and give it a name of newsletter.

Implementing The Policy
Create the file extensions/users-permissions/config/policies/userUpdate.js in your Strapi project. This file is where we will define the policy that Strapi will utilize when it receives a PUT request to the route /users.
module.exports = async (ctx, next) => {
  // If the user is an administrator we allow them to perform this action unrestricted
  if (ctx.state.user.role.name === "Administrator") {
    return next();
  }

  const { id: currentUserId } = ctx.state.user;
  // If you are using MongoDB do not parse the id to an int!
  const userToUpdate = Number.parseInt(ctx.params.id, 10);

  if (currentUserId !== userToUpdate) {
    return ctx.unauthorized("Unable to edit this user ID");
  }

  // Extract the fields regular users should be able to edit
  const { displayName, newsletter } = ctx.request.body;

  // Provide custom validation policy here
  if (displayName && displayName.trim() === "") {
    return ctx.badRequest("Display name is required");
  }

  // Setup the update object
  const updateData = {
    displayName,
    newsletter
  };

  // remove properties from the update object that are undefined (not submitted by the user in the PUT request)
  Object.keys(updateData).forEach((key) => updateData[key] === undefined && delete updateData[key]);
  if(Object.keys(updateData).length === 0) {
    return ctx.badRequest("No data submitted")
  }

  ctx.request.body = updateData;
  return next();
};
Later on we will dig deeper into what each part of this policy is doing. But for now, let's continue setting up Strapi to use this new policy.
Setting Permissions in the Strapi Admin
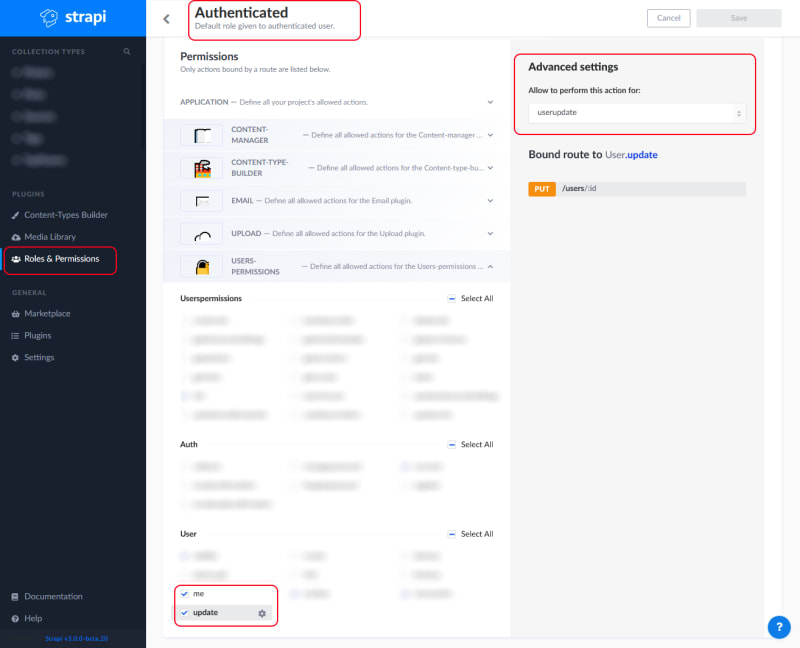
Verify that an authenticated user has access to the me and update actions via the roles & permissions plugin in the admin under the user permissions section. When checking the update option select our newly create userUpdate policy in the advanced settings. By selecting the policy from the policy select dropdown we'll ensure that each request made is checked by the policy before the controller receives the request.
Selecting these actions will allow a user to to make GET requests to /users/me and PUT requests to /users.
Note: Authenticated, in this case, means that we sent the request with an authorization header that includes a valid bearer token returned by the login route.
const res = await axios.get('http://localhost:1337/users/me', {
  headers: {
    Authorization: `Bearer ${token}`,
  },
})
Retrieving The Current User
The roles & permissions plugin includes a route /users/me that allows an authenticated user to retrieve information about themselves. If you are using a front-end with store such as Vuex or Redux, you may already have this information handy in your front-end application. We will use the data from this route in order to pre-populate our form fields for editing.
Creating and submitting a form on your client application is outside the scope of this article.
Now that we've verified we can access information about the authenticated user, we can allow a user to change some information about themselves using a PUT request to the update route that utilizes our new policy. Let's take a closer look at what this policy does.
Digging Deeper Into The Policy
Let's break this policy into a few chunks to analyze what it is doing.
Parse The Request Data
First, we verify who the user is, whether they are an admin, or they are a regular user trying to edit their own information.
  // If the user is an administrator we allow them to perform this action unrestricted
  if (ctx.state.user.role.name === "Administrator") {
    return next();
  }

  const { id: currentUserId } = ctx.state.user;
  // If you are using MongoDB do not parse the id to an int!
  const userToUpdate = Number.parseInt(ctx.params.id, 10);

  if (currentUserId !== userToUpdate) {
    return ctx.unauthorized("Unable to edit this user ID");
  }
If the user is an administrator, let the request go through as we assume they have all the permissions to perform any action on any user.
We are using object destructing to extract the authenticated user's id from the Strapi context and the ID parameter from the URL parameters. The ctx (context) variable passed into the policy is provide by the Roles & Permissions plugin and will include information about the currently authenticated user such as the `id` we are extracting.
If you are using MongoDB do not parse the ID to an int. MongoDB uses a UID user ID pattern.
Since we are using the plugin's existing controller, it is expecting a URL parameter for the user we are editing. Meaning a put request will need to go to the route /users/1 or /users/23 depending on the user being updated. Therefore, we need to verify the user is editing their own user information and not another user's information.
Extract The Data
  // Extract the fields regular users should be able to edit
  const { displayName, newsletter } = ctx.request.body;
Next, we extract the displayName and newsletter from the request body that the user submitted.
It is important to not blindly accept all parameters from the user as they could maliciously include additional fields such as role and elevate themselves to admin privileges.
Validation
  // Provide custom validation policy here
  if (displayName && displayName.trim() === "") {
    return ctx.badRequest("Display name is required");
  }
Within the policy is an excellent time to perform any additional validation. Even though Strapi has some validation built-in, such as string and boolean fields must match their respective types, you may not want to let users to have a display name of "Admin" or a series of spaces for example. In the policy you can perform your own simple validation or pull in a validation library of your choice.
Massage The Update Data
  const updateData = {
    displayName,
    newsletter
  };

  // remove properties from the update object that are undefined (not submitted by the user in the PUT request)
  Object.keys(updateData).forEach((key) => updateData[key] === undefined && delete updateData[key]);
  if(Object.keys(updateData).length === 0) {
    return ctx.badRequest("No data submitted")
  }

  ctx.request.body = updateData;
  return next();
We setup the updateData variable using ES2015 object property shorthand. Our variable names submitted by the user's request match the names we setup in the Strapi content builder so we can quickly initialize the update object. If your names don't match, you will need to use the standard object assignment.
Filter out any values that are undefined (not included in the PUT request), and if the user did not submit any valid data, we can short-circuit and return a badRequest letting the user know.
Finally, replace the ctx.request.body with our sanitized updateData and return next() to let Strapi know the request has passed the policy test and the controller can proceed.
Sending a request from the client
We've now allowed authenticated users to request data about themselves and send an update request with a policy applied to the request. When you are ready to send a request from the client, you can send an update like the following example using Axios.
const res = await axios.put('http://localhost:1337/users/1',
{
  displayName: "John Smith",
  newsletter: true
},
{
  headers: {
    Authorization: `Bearer ${token}`,
  },
})